User Tools
Table of Contents
Retro Game Makers with ugBASIC!
(Soft) introduction to gaphics
Preamble
At first, ugBASIC can be intimidating. There are literally hundreds of different commands to contend with, and it's easy to get bogged down in unnecessary details. So let's start from one aspect, which is that relating to the graphic system. I'll focus on the specific instructions you need to make the best use of graphics in your programs. Once you've learned the basics, learning the rest of the commands should be easy. In case you get stuck reading this guide, refer to the ugBASIC user manual and its practical guides: they may come in handy!
Resolution and colors in the isomorphic world

ugBASIC is an isomorphic language. This means that it does not force you to program either for a specific computer, as happens with assembly, or for one that does not exist, as happens with other languages. In other words, it does not offer you an “abstraction” to refer to.
This means that, when you go to draw an image that will then be used in the game or you want to draw points on the screen, you do not have precise indications of what the maximum resolution will be, or the number of contemporary colors or other indications as well.
This will depend on the final hardware.
What you can do is to draw basing on the available information at runtime: it will be the compiler for that particular platform to convert the operations into a suitable format, or to warn you if something needs to be changed, if (for example) the conversion of the graphic resources should not be possible.
Choosing the drawing screen
So if you want to start somewhere, and if you want to draw something, you need to tell ugBASIC that you want to start drawing points, and then find an easy way to specify the exact position of the points on the screen.
With this first instruction we indicate which are the characteristics of the screen you want:
BITMAP ENABLE (160,200,16)
You are therefore asking for a “bitmap” graphic (BITMAP ENABLE) with a suggested resolution of 160×200 pixels (160,200), and with 16 different colors. These may not necessarily be the actual features you will get: the hardware may not have bitmap mode, or there may be fewer colors available, and so on. The specific compiler for that platform has some leeway in deciding how to best fulfill your request.
Introduce a reference system
Now take the PLOT command, the purpose of which is to change the color of a single point (or pixel) on the screen.
We can't just type:
PLOT RED
as there are (literally) thousands of different points to choose from. So how can ugBASIC know what precise point we are referring to? In practice, we need to introduce a reference system in which each point on the screen can be identified using a pair of numbers. This pair is called “coordinates” (abscissa and ordinate), and they measure the distance from the top left corner. That point in the upper left is called the “origin”.
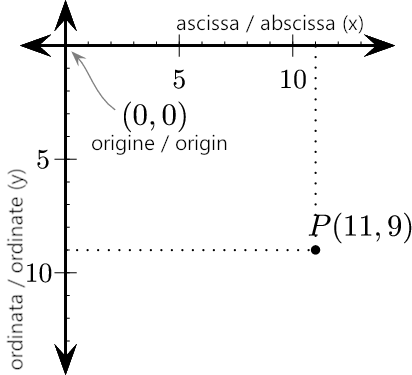
Traditionally, the two components of a coordinate are given the names x and y, and represent (respectively) the horizontal and vertical distance from the point of origin. Whenever we insert the two coordinates in our instructions, we always separate them with a comma: x, y. It's a bit like references to a map grid, with the first number indicating the x and the second the y coordinate.
So if the coordinate 0,0 points to the upper left point of the screen, how can we know where the lower right point is?
Let's see the specific instructions of ugBASIC that come to our aid:
(SCREEN) WIDTH, to get the actual screen width, expressed in pixels;(SCREEN) HEIGHT, to get the actual screen height, expressed in pixels;(SCREEN) COLORS, to get the number of colors that can be used concurrently;(SCREEN) SHADES, to get the number of colors that can be used at maximum.
In all the instructions, the keyword SCREEN can be omitted, for the sake of brevity.
Let's compile the first program!
Let's take a look at the use of these coordinates. Load your favorite editor (we recommend Visual Studio Code) and type the following program, saving it in the first.bas file:
  BITMAP ENABLE (160,200,16)
  PLOT WIDTH / 2, HEIGHT / 2
Now fill it out. A unique feature of ugBASIC is to have many separate compilers, one for each “target” or for each model of retrocomputer, and executable from both Linux and Microsoft Windows. Do not be scared! Each compiler clearly does the same thing: it reads an ugBASIC program and translates it into the specific machine language for that platform: it goes without saying that the instructions will be optimized for that specific hardware.
To compile an ugBASIC program, and to directly obtain the executable, simply invoke the command line of the corresponding compiler.
I.e.:
ugbc.atari first.bas -o first.xex
will generate, under Linux, an executable for Atari 400/800 machines, while the following command:
ugbc.pc128op.exe first.bas -o first.k7
will generate, under Microsoft Windows, an executable for Olivetti Prodest PC128 machines.
If you do not get any error messages then the executable will be ready to run on the emulator or on the real hardware, after having properly copied the file produced on a physical medium.
Let's see the results
Returning to the program, by running it you will see a white point appearing in the center of a black screen. The PLOT command is available in two versions. The simplest version is:
PLOT x, y
This version plots a single point at x, y coordinates. Try replacing these coordinates with any pair of values. In no time, you will be able to place the point anywhere on the screen.
A touch of color
The next step is to add some color to the scene. The selected screen allows you to view up to SCREEN COLORS colors at the same time (remember, ugBASIC is an isomorphic language!).
Each color is entered into ugBASIC in two ways:
- with a numeric index between
0andSCREEN COLORS-1; - with the symbolic name of the desired color, which is however internally translated into one of the above numerical indices.
| BLACK | WHITE | RED |
| CYAN | VIOLET | GREEN |
| BLUE | YELLOW | ORANGE |
| BROWN | LIGHT RED | DARK GREY |
| GREY | LIGHT GREEN | LIGHT BLUE |
| LIGHT GREY | DARK BLUE | MAGENTA |
| PURPLE | LAVENDER | GOLD |
| TURQUOISE | TAN | YELLOW GREEN |
| OLIVE GREEN | PINK | PEACH |
I will now demonstrate how to use colors, using an extended version of the previous PLOT command.
The command has the form
PLOT x, y, colore
So if you type and then compile the program:
  PLOT 160, 100, 0
  PLOT 50, 50, 5
you will draw a first point 160 pixels left from the edge of the screen and 100 pixels from the top edge of the screen, with the color having index 0 (usually black, but not necessarily), while you will draw a second point at the coordinates 50 pixels on the left, 50 pixels on the other, with the color having index 5 (what color is it? I don't know, it depends on the hardware).
If you want to be sure to draw a pixel of a certain color you have to use the symbolic name:
  PLOT 160, 100, BLACK
  PLOT 50, 50, BLUE
Let's now see an example of a program.
 BITMAP ENABLE(16)
 CLS BLACK
 DO
    x = RND(SCREEN WIDTH-1)
    y = RND(SCREEN HEIGHT-1)
    c = RND(SCREEN COLORS-1)
    PLOT x, y, c
 LOOP
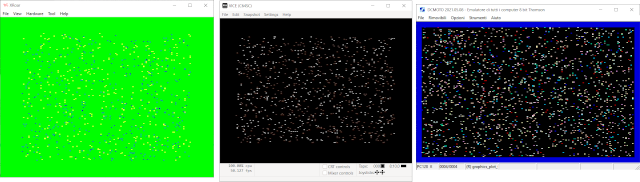
When you run this program, your computer display will fill with hundreds of multicolored dots. Quite boring. You can exit the program by resetting your computer.
Let's play with shades
At first glance, the 16 suggested colors may seem limiting, and indeed they are, but if you go down to the level of a specific retrocomputer, you can take advantage of its characteristics to overcome this limit.
For example, some computers such as the Olivetti Prodest 128 or the ATARI allow you to redefine each individual color, and therefore each index can actually be assigned a shade from the various shades available.
So the indices now represent a small selection from a wide range of possible colors. It is up to you to decide which color a particular index number will display. If you like to play you can also set each index to exactly the same key, for ugBASIC it doesn't matter!
You can change the used hues of each color index at any time with the COLOR command:
COLOR index, shade
The shade value defines the precise hue of the color to be assigned to our index. If we wish, we can set this number directly to a value between 0 and SCREEN SHADES. Typically, however, we use a function that allows us to mix the gradient by obtaining it from the sum of three simple components.
The gradient can be obtained with the RGB function:
shade = RGB(21, 11, 23)
Each of the function parameters controls the amounts (respectively) of red, green or blue in the final color, and can range from 0 to 255. The higher the value, the brighter the hue.
Some examples are:
 nero = RGB( 0, 0, 0 )
 grigioScuro = RGB( 32, 32, 32 )
 rosso = RGB( 128, 0, 0 )
 verde = RGB( 0, 128, 0 )
 blu= RGB( 0, 0, 128 )
The background color
Each time we run one of our ugBASIC programs, the screen is automatically filled with a color of 0. Normally this will be set to BLACK but we can change it, if the hardware allows it, to transform the display into a kaleidoscope of colors.
Let's try to write the following program:
 BITMAP ENABLE
 CLS BLACK
 DO
    COLOR 0, $555
    COLOR 0, $900
    COLOR 0, $090
    COLOR 0, $009
    COLOR 0, $990
 LOOP
By running the program, you will be able to see the background change quickly with rather dark colors. The reason is that you used just over half of the available brightness levels. Each component can be assigned one of the sixteen shades available. Unfortunately this poses a problem: we cannot represent 16 values using a single digit, as there are only 10 digits (0 to 9).
Learn to use hexadecimal numbers
We can get around this dilemma by using hexadecimal numbers. These give us a total of 16 digits at the same time. To distinguish them from traditional decimal numbers, ugBASIC expects us to add a sign next to them that characterizes them as such.
The language supports a very large set of prefixes:
$(dollar);&H(ampersand andhletter);0x(zero followed byx);
in addition to the h (letter) suffix;
However, the first 10 digits are identical to the normal decimal system. That's why the previous examples seemed to work. However, the digits from 10 to 15 are represented by the letters A, B, C, D, E and F (lowercase or uppercase does not matter).
Here is a complete list of the 16 hexadecimal digits, with their decimal value.
| 0 | 1 | 2 | 3 | 4 | 5 | 6 | 7 | 8 | 9 | A | B | C | D | E | F |
| 0 | 1 | 2 | 3 | 4 | 5 | 6 | 7 | 8 | 9 | 10 | 11 | 12 | 13 | 14 | 15 |
Let's see some examples with hexadecimal numbers:
  COLOR 0, $FFF : ' BIANCO PURO
  COLOR 0, $F00 : ' ROSSO LUMINOSO
  COLOR 0, $0F0 : ' VERDE LUMINOSO
  COLOR 0, $00F : ' BLU LUMINOSO
  COLOR 0, $FF0 : ' GIALLO
Let's show the colors!
In general, the current colors for any index can be shown on the screen in hexadecimal format using the COLOR function:
PRINT HEX$( COLOR( 0 ) )
This command shows the color values assigned to index 0. The HEX$ function converts the number to hex, so that we can check its individual color components. With practice you will be able to visualize a color directly from its intensity values. It's really easy once you've got your eye on it.
One command for many colors
At the beginning of the program, it is often necessary to set a predefined set of colors, all at once. Since each value can be loaded using a separate COLOR statement, ugBASIC includes a PALETTE command that allows you to access all colors on a single line.
PALETTE c0, c1, c2, c3, c4 ...
This instruction loads color c0 as the background color, color c1 as the first color, and so on. The number of colors can be whatever you want, but clearly each single target will impose a certain maximum number of colors, depending on the capabilities of the graphics subsystem.
It is possible to assign fewer values than those available, and this implies that the remaining colors will assume the default value.
For example, to set the background color you can do it with:
PALETTE BLACK
If, on the other hand, you assign more values than the system can actually handle, ugBASIC will not issue any error but it will use the last values to overwrite the first ones. For example, ATARI systems usually have 4 colors and therefore the following command:
PALETTE BLACK, RED, GREEN, BLUE, WHITE
it will only set the background to white (WHITE), because the fifth color will correspond to the zero color (background). On the Olivetti Prodest PC128 computer, however, the background will remain black (BLACK).
For example, if you want to define a palette made up of shades of gray, you can use the following command:
  PALETTE RGB($00,$00,$00), RGB($11,$11,$11), RGB($22,$22,$22), _
          RGB($33,$33,$33), RGB($44,$44,$44), RGB($55,$55,$55), _
          RGB($66,$66,$66), RGB($77,$77,$77), RGB($88,$88,$88), _
          RGB($99,$99,$99), RGB($AA,$AA,$AA), RGB($BB,$BB,$BB), _
          RGB($CC,$CC,$CC), RGB($DD,$DD,$DD), RGB($EE,$EE,$EE), _
          RGB($FF,$FF,$FF)
Notice how we use the underscore character (_) to signal that the logical line continues on the next physical line. This is how multiline statements can be written on ugBASIC.
POWERED BY

Page Tools
